



























ТЕХНИЧЕСКАЯ ПОДДЕРЖКА


Опубликовано 2026-07-06
01Быстрый ответ
Чтобы настроить микросервоприводс помощью Arduino подключитесервоприводсигнальный провод к цифровому контакту с поддержкой ШИМ (обычно контакт 9), провод питания к 5 В и заземление к GND. Загрузите простой эскиз развертки или управления положением, используясервопривод.h библиотека. Эта установка обеспечивает точный угловой контроль от 0 до 180 градусов, что идеально подходит для робототехники, прототипов автоматизации и приложений управления движением. Однако необходимо учитывать ограничения мощности и требования к крутящему моменту, особенно при использовании нескольких сервоприводов или непрерывном вращении.
02Введение
У вас есть проект, требующий точного движения, но механизм заклинивает, угол смещается или сервопривод просто не реагирует. Это распространенное разочарование при интеграцииМикро Сервоприводс Arduino впервые. Проблема редко заключается в аппаратном обеспечении. Чаще всего это ошибка проводки, недостаточное питание, неправильное использование библиотеки или непонимание синхронизации сигнала ШИМ. Для инженеров, любителей и команд разработчиков прототипов каждый час, потраченный на отладку базовой настройки сервопривода, — это время, потерянное на реальном приложении — будь то роботизированная рука, поворотно-наклонная камера или автоматический клапан. В этом руководстве подробно описываются шаги, необходимые для полученияМикро Сервоприводработает надежно, и что проверять, если это не так.
03Оглавление
1. Что вам нужно перед началом
2. ПодключениеМикро Сервоприводв Ардуино
3. Понимание сигнала сервоуправления
4. Написание и загрузка базового управляющего кода
5. Распространенные проблемы и способы их устранения
6. Вопросы мощности и риски
7. Выбор подходящего микросервопривода для вашего проекта
8. Основные характеристики для сравнения
9. Вопросы, которые покупатели часто задают о настройке сервопривода
10. Как заставить работать ваш первый проект управления движением
04Что вам нужно перед началом
Прежде чем писать какой-либо код, убедитесь, что у вас есть следующие компоненты:
Плата Arduino (Uno, Nano, Mega или совместимая)
Амикро сервопривод(обычно SG90, MG90S или аналогичный тип на 5 В)
Перемычки (мама-папа для подключения к макетной плате)
Макет или прямое подключение
Стабильный источник питания 5 В (одного USB может быть недостаточно)
Многие новички предполагают, что вывод 5 В Arduino может питать любой сервопривод. Это не всегда безопасно. Типичный микросервопривод потребляет ток 200–500 мА под нагрузкой, а пиковые значения могут превышать 1 А. Встроенный регулятор Arduino не рассчитан на постоянный ток выше 500 мА. Если сервопривод останавливается или сбрасывает плату, мощность — это первая переменная, которую следует проверить.
05Подключение микросервопривода к Arduino
Большинство микросервоприводов используют стандартный трехпроводной интерфейс:
Коричневый или черный провод: Земля (ЗЕМЛЯ)

Красный провод: Мощность (5 В)
Оранжевый или желтый провод: Сигнал (контакт ШИМ)
Подключите следующим образом:
Используйте отдельный внешний источник питания 5 В, если работает более одного сервопривода или если сервопривод находится под постоянной нагрузкой. В этом случае подключите питание сервопривода и заземление непосредственно к внешнему источнику питания и разделите линию заземления только с Arduino. Это предотвращает падение напряжения, которое приводит к неустойчивому поведению.
06Понимание сигнала управления сервоприводом
Амикро сервоприводуправляется сигналом широтно-импульсной модуляции (ШИМ). Сервопривод ожидает импульс каждые 20 миллисекунд (50 Гц). Ширина импульса определяет положение:
Импульс 1 мс → 0 градусов
Импульс 1,5 мс → 90 градусов (центр)
Импульс 2 мс → 180 градусов
Библиотека Arduino Servo.h автоматически обрабатывает эти тайминги. Вам не нужно генерировать ШИМ вручную, если вы не работаете с сервоприводом непрерывного вращения или нестандартной моделью. Однако понимание этого сигнала помогает при устранении неполадок. Если сервопривод дергается или движется только частично, диапазон ширины импульса может отличаться от стандартных 1–2 мс. Некоторым сервоприводам для полного диапазона требуется 0,5–2,5 мс.
07Написание и загрузка базового управляющего кода
Ниже приведен минимальный эскиз для проверки микросервопривода. Он качается от 0 до 180 градусов и обратно.
#включатьСервопривод myServo; интервал позиции = 0; void setup() { myServo.attach(9); // Сигнальный контакт } void Loop() { for (pos = 0; pos = 0; pos -= 1) { myServo.write(pos); задержка(15); } } Загрузите это на свой Arduino. Сервопривод должен двигаться плавно. Если это не так, проверьте следующее по порядку:
1. Напряжение питания (измеряется на красном проводе сервопривода)
2. Полярность проводки (перепутанное питание повреждает сервоприводы)
3. Номер контакта вприкреплять()функция соответствует проводке
4. Корректно включена библиотека (предустановлен Servo.h)
Для точного контроля положения замените контур развертки намойСерво.запись(90);установить фиксированный угол. ИспользоватьmyServo.writeMicroсекунды(1500);для контроля времени на микросекундном уровне.
08Распространенные проблемы и способы их устранения
Даже при правильной проводке сервоприводы могут вести себя непредсказуемо. Наиболее частые проблемы:
Сервопривод дрожит или вибрирует: Часто возникает из-за нестабильного питания или электрических помех двигателя. Добавьте электролитический конденсатор емкостью от 100 до 470 мкФ между 5 В и заземлением рядом с сервоприводом.
Сервопривод не двигается: Проверьте, подключен ли сигнальный провод к контакту с поддержкой ШИМ. На Arduino Uno контакты 3, 5, 6, 9, 10 и 11 поддерживают ШИМ. Пин 13 нет.
Сервопривод перемещается только в части диапазона: Диапазон ширины импульса может быть нестандартным. ИспользоватьmyServo.attach(9, 500, 2500);для установки минимальной и максимальной ширины импульса.
Arduino сбрасывается при движении сервопривода: Сервопривод потребляет больше тока, чем может обеспечить порт USB. Используйте внешний источник питания 5 В с силой тока не менее 1 А.
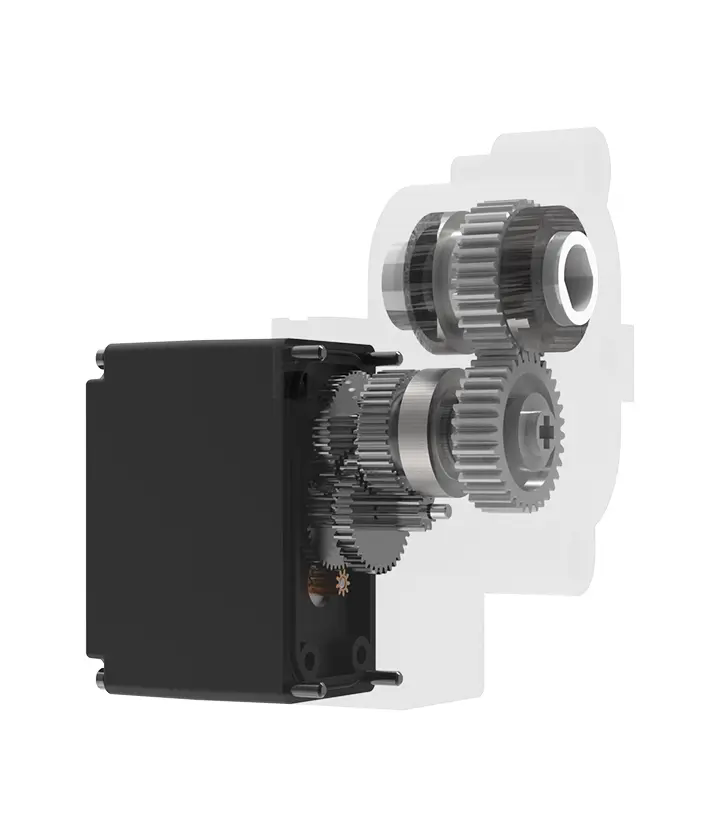
Сервопривод становится горячим: Постоянное торможение или перенапряжение. Убедитесь, что сервопривод рассчитан на напряжение 5 В, и уменьшите механическую нагрузку, если он борется с заеданием соединения.
09Вопросы электропитания и риски
Мощность – самый недооцененный фактор всерводвигательпроекты. Один микросервопривод под нагрузкой может потреблять ток 700–1000 мА. Если вы используете два или три сервопривода, общий ток может превышать 2 А. Вывод 5 В Arduino, питаемый через USB, обычно обеспечивает только 500 мА.
Стратегия безопасного энергоснабжения :
Для 1 сервопривода с небольшой нагрузкой: для тестирования допускается вывод Arduino 5 В.
Для 2+ сервоприводов или непрерывной работы: используйте отдельный источник питания 5 В 2 А+.
Всегда общие заземления между Arduino и внешним источником питания.
Добавьте конденсатор (100–470 мкФ) к линиям питания сервопривода, чтобы сгладить скачки тока.
Игнорирование питания может привести к повреждению регулятора напряжения Arduino, повреждению данных или остановке сервопривода в критический момент вашего приложения.
10Выбор подходящего микросервопривода для вашего проекта
Не все микросервоприводы одинаковы. Выбор зависит от крутящего момента, скорости, напряжения и материала шестерни.
Пластиковые шестерни сервоприводов(например, SG90): Легкий и недорогой, подходит для применений с низким крутящим моментом, таких как небольшие поворотно-наклонные устройства или легкая робототехника. Они легко рвутся при ударных нагрузках.
Сервоприводы с металлическими шестернями(например, MG90S): более тяжелый, но гораздо более прочный. Подходит для применений, в которых сервопривод может подвергаться вибрации или внешней силе, например, в роботизированных манипуляторах или шагающих роботах.
Сервоприводы непрерывного вращения: изменено для свободного вращения в обоих направлениях. Полезно для колес или конвейерных лент. Они не могут удерживать фиксированное положение. Управление использует скорость вместо угла.
Большинству новичков для обучения и создания прототипов достаточно стандартного микросервопривода 9g (SG90 или эквивалентного). Для производства или длительного использования рассмотритеиндивидуальные серворешенияс усиленными шестернями или более высоким крутящим моментом.
11Ключевые характеристики для сравнения
При оценке микросервоприводов сравните следующие параметры:
Используйте эту таблицу при сравнении сервоприводов разных поставщиков. Более дешевый сервопривод с меньшим крутящим моментом может привести к задержке проекта, если он выйдет из строя под нагрузкой. Более дорогойсервопривод с металлической шестернейможет со временем сэкономить затраты на замену.
12Вопросы, которые часто задают покупатели о настройке сервопривода
1. Могу ли я запитать микросервопривод напрямую от контакта Arduino 5 В?
Для одного сервопривода во время краткого тестирования — да. Для непрерывной работы или нескольких сервоприводов используйте внешний источник питания 5 В. Регулятор Arduino не может выдерживать большой ток.
2. Почему мой сервопривод перемещается только на 90 градусов, а не на 180?
Некоторые сервоприводы имеют ограниченный диапазон вращения. Проверьте таблицу данных. В качестве альтернативы диапазон ширины импульса может потребовать регулировки с помощьюmyServo.attach(pin, min, max) .
3. Что произойдет, если я подключу сервопривод к 3,3 В?
Сервопривод может не двигаться или двигаться медленно. Большинству микросервоприводов для надежной работы требуется напряжение не менее 4,5 В. Использование 3,3 В может привести к остановке и перегреву.
4. Могу ли я управлять несколькими сервоприводами с помощью Arduino?
Да. Каждому сервоприводу нужен отдельный вывод ШИМ. Используйте несколькоСервоприводобъекты в коде. Убедитесь, что общий потребляемый ток не превышает мощность вашего источника питания.
5. Как заставить сервопривод удерживать свое положение без питания?
Стандартные сервоприводы не могут удерживать положение без питания. Для удержания груза используйте сервопривод с металлической шестерней и механическим замком или добавьте отдельный тормозной механизм.
6. В чем разница между аналоговыми и цифровыми сервоприводами?
Аналоговые сервоприводы используют более простой контур управления и менее отзывчивы. Цифровые сервоприводы используют более высокочастотный управляющий сигнал, обеспечивая более быстрый отклик и более сильный удерживающий момент, но потребляют больше тока.
7. Могу ли я использовать микросервопривод для непрерывного вращения?
Стандартные микросервоприводы предназначены только для положения. Для непрерывного вращения вам понадобится модифицированный сервопривод или специально разработанный сервопривод непрерывного вращения. Модификация стандартного сервопривода требует изменений внутреннего оборудования.
8. Почему мой сервопривод дергается при подключении к Arduino?
Обычно это вызвано колебаниями мощности. Добавьте конденсатор на линии электропередачи. Если подергивания продолжаются, проверьте, нет ли ослабленной проводки или неисправен сервопривод.
9. Какова максимальная длина кабеля для микросервопривода?
Для надежной передачи сигнала держите сервокабели на расстоянии не более 30–50 см. Более длинные кабели могут вызвать шум и падение напряжения. Используйте экранированные кабели, если неизбежна более длинная длина.
10. Нужна ли мне плата сервопривода для базовых проектов?
Нет. Библиотека Arduino Servo отвечает за генерацию ШИМ. Плата драйвера необходима только для мощных сервоприводов или когда требуется точная синхронизация для нескольких сервоприводов одновременно.
13Как заставить ваш первый проект управления движением работать
Настройкамикро сервоприводс Arduino — простая задача, если вы соблюдаете правильную проводку, питание и последовательность кода. Наиболее распространенные неисправности не являются аппаратными дефектами — это недооценка мощности, неправильное назначение контактов или предположение, что все сервоприводы используют один и тот же диапазон импульсов.
Чтобы перейти от тестирования к реальному приложению:
Начните с одного сервопривода с внешним питанием
Прежде чем добавлять логику кода, проверьте полный диапазон движения механически.
Добавьте конденсаторы для стабилизации мощности
Перед окончательной сборкой протестируйте ожидаемую нагрузку.
Используйте мультиметр для проверки напряжения на клеммах сервопривода.
Если вы приобретаете сервоприводы для серийного прототипа, запросите образец у своего поставщика и протестируйте его в реальных условиях нагрузки. Задокументируйте диапазон ширины импульса, ток остановки и рабочую температуру. Эти измерения будут определять ваши проектные решения и предотвращать сбои в эксплуатации.
Для команд, оценивающихприложения для управления движениемили при переходе от прототипа к производству, решающее значение имеет работа с поставщиком, который предоставляет подробную техническую документацию и обеспечивает стабильную производительность сервопривода. Не полагайтесь на общие характеристики из списков на торговых площадках. Запросите фактические данные испытаний для партии, которую вы покупаете.
Когда вы будете готовы двигаться дальше, отправьте технические характеристики вашего проекта, включая требования к крутящему моменту, рабочее напряжение и ожидаемый срок службы, своему инженеру. Технический анализ выбранного вами сервопривода может сэкономить недели на доработку и избежать дорогостоящих замен на месте.
Время обновления: 6 июля 2026 г.

Свяжитесь со специалистом по продукции Kpower, чтобы порекомендовать подходящий двигатель или редуктор для вашего продукта.


