


TECHNICAL SUPPORT


Published 2026-02-14
When you are engaged in product innovation, you want to use theservoon a car or robot, but once you get started, you find that the steering is not smooth enough and the response is always a beat slow? Don’t worry, this is a hurdle that almost every beginner will encounter. The steering gear looks simple, but if you want it to be obedient and accurately control the direction of the car model, there are still many tricks behind it. Today we will talk about how to make theservothe "old driver" of your creative car.
Many friends installed theservoon the car for the first time. After turning on the power, they found that it either kept shaking in place or the steering angle was not correct at all. This is actually because the servo is a closed-loop control system inside, which needs to constantly read the current position and compare it with the target position. If your control signal is unstable or the power supply is insufficient, it will wander around like a headless fly. To put it bluntly, it's like asking a short-sighted person to drive without glasses.
Another common problem is mechanical gaps. If the connection between the output shaft of the steering gear and the steering mechanism of the wheel is not tight and there is mineral content, then the steering gear may move but the wheel may not move; or the wheel may move but the steering gear cannot sense it. This will cause the control accuracy to be greatly reduced, and the car will run on a crooked route. Therefore, I initially blamed the poor quality of the servo, which may have been wronged.
️Lookat torque and speed: When choosing a steering gear for a car, you must first look at two core parameters: torque and speed. Torque determines how powerful it is to turn the wheels, especially when turning the car when it is parked. If the torque is not enough, it cannot turn at all. Speed affects the steering response, usually expressed in "seconds/60 degrees". Generally speaking, for car models around 1:10, it is enough to choose a metal gear servo with a few kilograms of torque, which is both powerful and durable.
️Digital servo or analog servo: This is a common question. Simply put, analog servos are cheap and have simple control logic, but they have response dead zones and average accuracy. The digital servo uses a higher frequency pulse signal, which has faster response, more accurate positioning, and can output greater holding torque in the neutral position. If your budget allows it, for better control, it is a wise choice to directly use the digital servo.
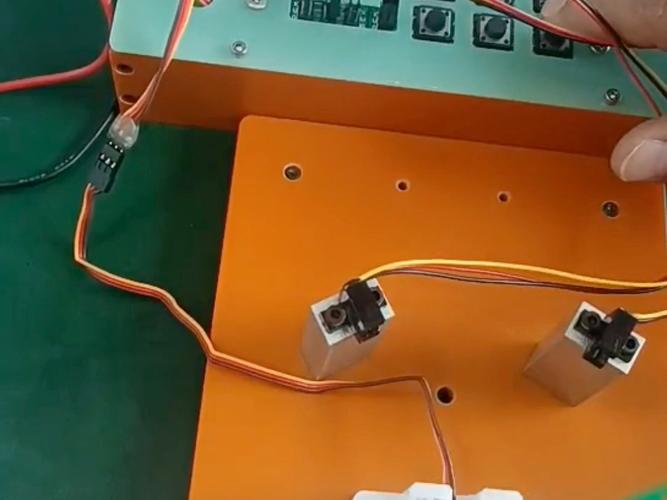
The first step is to ensure that the servo mounting bracket is rigid and cannot shake at all after tightening the screws. Any small shaking will be magnified when reflected on the wheels. The second and crucial step is to connect the servo arm and steering rod. Try to ensure that the pull rod is horizontal and that when the servo arm is in the neutral position, the left and right steering angles are equal. It's like tuning a guitar string. You have to fine-tune the length of the drawbar little by little until the angles in the left and right directions are exactly the same.
Don't forget to add a little grease to the moving joints to reduce friction. After installation, gently shake the wheel with your hand to check if there is any gap. If there is, it means there is a gap in the ball head buckle or the joint, and you need to put something on it or replace it with a tighter fitting. The level of detail in this step directly determines your mood for subsequent debugging.
Using only a simple PWM signal to control the servo is like telling a person "go there" but not telling him how to go. The PID (Proportional-Integral-Derivative) algorithm is like a navigation. It calculates the error between the current position and the target position in real time, and corrects it through three links. P (proportional) is responsible for giving corrections based on the current error size. If the error is large, the direction will be changed; I (integral) is responsible for eliminating long-term static deviations, such as always being a little to the left; D (differential) can predict the trend of error changes and suppress overshoot in advance.
Imagine you make a 30-degree turn in your car. Without PID, the servo may overshoot all of a sudden, then shake back, and it may take several back and forth steps to stabilize. With PID adjustment, it can reach the designated position smoothly and quickly, and stop steadily with almost no overshoot. This is why the steering of cars tuned by experts feels particularly "following".
There is a painful lesson here, never directly connect the power line of the servo to the 5V pin of the development board. The current when the servo is started and blocked is very large. It can easily burn a few amps and burn the motherboard in minutes. The correct approach is to prepare an independent power supply for the servo, usually a 2S lithium battery, and stabilize the voltage at the servo's operating voltage (such as 6V or 7.4V) through a BEC (voltage regulator) or UBEC.
As for the signal line, connect it to the PWM output pin of your main control board (such as or STM32). Remember, they must share the ground! Connect the negative pole of the servo power supply to the GND of the main control board to ensure that the signals have a unified reference point. Wires should also be thicker, especially power cords. Thin wires will produce voltage drops under high current, causing the servo to become weak.
When initializing, be sure to send a neutral signal (such as 1.5ms pulse width) to the servo first so that it knows where the "zero point" is. Then, when changing the angle, the step value of the pulse width should not be too large, otherwise you will hear a loud "click" sound, which means that the gear is hitting hard and it is easy to sweep the teeth. A smooth transition should be used to increase or decrease the pulse width little by little.
When debugging, you can put the car in the air and observe whether the wheels turn smoothly. Print out the target angle and current feedback angle (if any) in the code to see if there is any lag or jitter. If you encounter jitter, in addition to checking the PID parameters, you should also check whether the frequency of the PWM signal is wrong. Standard servos generally receive a 50Hz PWM signal. If the frequency is too high, it may not recognize it.
After talking so much, in fact, making the servo obedient is a step-by-step process from selection, installation to debugging. When you personally adjust a car that can accurately corner, the sense of accomplishment is unparalleled. I wonder what is the strangest servo "draught" phenomenon you have ever encountered while working on a project? Welcome to share your stories in the comment area, let’s communicate and avoid pitfalls together! If you find the content useful, don't forget to like and share it with more friends who need it.
Update Time:2026-02-14
Contact Kpower's product specialist to recommend suitable motor or gearbox for your product.


