


TECHNICAL SUPPORT


Published 2026-02-23
Don’t understand theservodrive module? Don't worry, you will understand after reading this article
Many friends who are new to product innovation always get stuck in the same place when usingservos: Why doesn’t theservos they buy not move when they are directly connected to the power supply? Is it broken? In fact, it is not the problem of the servo, but that you are missing a key "middleman" - the servo drive module. Simply put, the servo drive module is the bridge that connects your main control brain (such as a microcontroller) and the servo itself. It is responsible for interpreting the control signal and providing enough power to accurately turn the servo to the angle you want. Without it, there would be a wall between your thoughts and the action of the servo, with no communication possible.
You may be thinking, won’t the motor start spinning when the power is turned on? The steering gear is essentially a motor, but it integrates a reduction gear and a feedback circuit, making it a precise closed-loop system. Directly connect it to a stable 5V power supply, and it will indeed "power on", but it will just stupidly move to a fixed position or remain motionless because it has not received instructions. What it needs is a periodic pulse signal, which is what we often call a PWM wave, to tell it "how many degrees it should turn now." Although your main control chip can generate this signal, the output current is too small. It is like using a thin water pipe to drive a large waterwheel and cannot push it at all. At this time, the large water pump of the drive module is needed to provide power.
It has two core functions: signal isolation and amplification, and providing stable power supply. First, it receives the weak PWM signal from the main control chip, shapes and enhances it to ensure that the signal is not distorted during transmission and can be accurately recognized by the servo. Secondly, and more importantly, it provides a powerful and independent power interface for the servo. The current of the servo will be very large when it is started or blocked. If the power is taken directly from the main control board, it is easy to burn the main control chip or cause the system voltage to drop suddenly or restart to crash. The drive module is like a reliable power supply, smoothly delivering energy from the external power supply to the servo while protecting your main control brain from interference.
There are all kinds of driver modules on the market. What should you do if you are overwhelmed? Just remember these points.️First, look at the number of channels. How many servos are used in your project depends on the number of channels. For example, you may need 6 channels to control a simple robotic arm. Don’t buy less.️Second, look at the voltage and current. This is the most important thing! Be sure to check whether the voltage range supported by the module matches the working voltage of your servo (usually 5V or 6V), and pay more attention to the maximum current that the module can continuously output. If your servo is a high-torque metal servo, you must choose a module that can output 10A or higher current. Don't be limited by small modules. ️Third, look at the communication interface. The most common one is the I2C interface, which can control dozens of servos with only two wires, which saves the pin resources of the main control and is especially friendly to beginners.
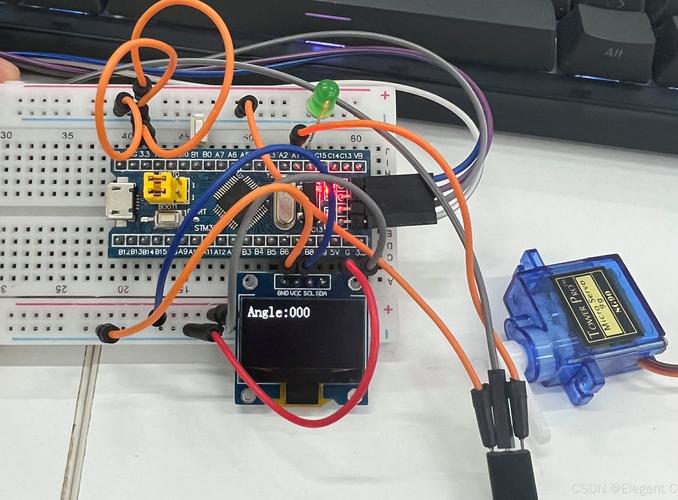
It’s actually easier than you think, just like building blocks. The first step is to supply power to the module: Connect the positive and negative poles of the external power supply (such as a battery pack) to the power input terminal of the module. Be careful not to reverse the positive and negative poles, otherwise it may cause smoke. The second step is to connect the servo: Connect your servo signal wire (usually a yellow or white wire) to the signal output port of the module. The red wire is connected to the positive pole, and the brown or black wire is connected to the negative pole, corresponding one to one. The third step is to connect the main control: Use Dupont wire to connect the I2C interface (SDA and SCL) of the module to your or STM32, and then connect to the common ground (GND to GND). The hardware connection is complete, and all that remains is to write a few lines of code to call the library file to generate control signals.
The most intuitive benefit is that the stability of your project will soar. In the past, the microcontroller might restart as soon as the servo moved. After adding the driver module, the power supply is steadily isolated and supplied, and this annoying problem will never occur again. Moreover, the PWM waveform output by a high-quality driver module is cleaner and more precise, and the rotation of the servo will be smoother and have less jitter, which is crucial for robots or gimbals that require precise angle control. You no longer need to worry about underlying issues such as power distribution and signal interference. You can focus all your energy on your product function innovation and algorithm implementation, doubling your development efficiency.
As someone who has been there, let me give you a heads up. 1.Insufficient power supply: Many people use a mobile phone charger to power a large servo. As a result, the voltage is broken when a heavy object is pulled, and the module flashes red or even shuts down. Be sure to calculate the total power consumption and choose a power adapter or battery with sufficient power. 2.Loose wiring: The servo vibrates a lot when it rotates. If the wiring terminals are not tightly plugged in or the screws are not tightened properly, it is easy to suddenly disconnect during movement, resulting in loss of control. It is recommended that all connections be secure and fixed with glue if necessary. 3.Ignore heat dissipation: When working continuously with high current, the chip on the driver module will be very hot. If the module does not have a heat sink, consider installing a heat sink or actively dissipating heat, otherwise the overheating protection will fail.
Seeing this, do you already have a clearer understanding of the servo drive module? In fact, if you choose the right one and use it well, your journey to creative realization will be more than half successful. I don’t know what cool actions you plan to use the servo to achieve in the project you are working on? Welcome to share it in the comment area, let's communicate and discuss together. If you find this article useful to you, don't forget to like and share it with more friends who need it!
Update Time:2026-02-23
Contact Kpower's product specialist to recommend suitable motor or gearbox for your product.


