


TECHNICAL SUPPORT


Published 2026-03-16
Are you tinkering with a small robot or robotic arm? You have twoservos on hand, but you don’t know where to start with a bunch of wires? Don't worry, this is a headache that every newbie who playsservos will encounter. Today I will put aside those complicated theories, use the most down-to-earth vernacular, and combine it with my daily tossing experience to tell you how to connect and use the twoservos. I guarantee that you can get started after listening to it.
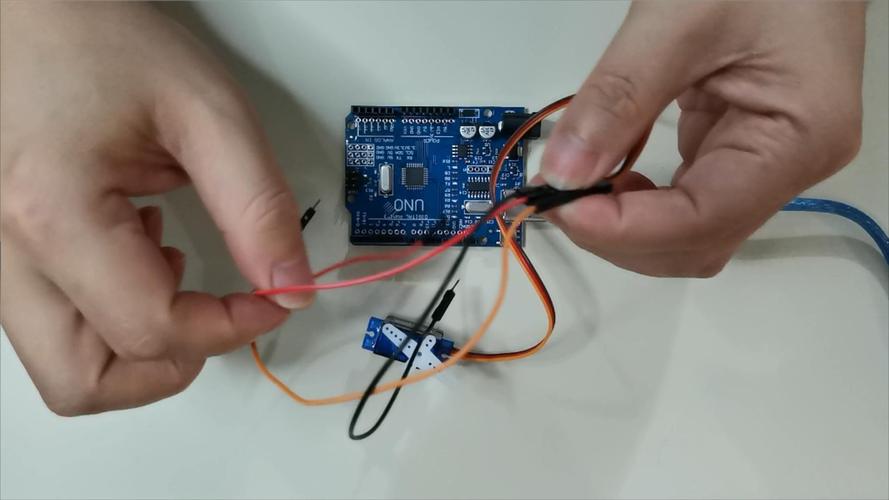
Wiring is actually not as mysterious as you think. There are usually three wires drawn from the back of the servo: the red one is connected to the positive pole, the brown or black one is connected to the negative pole (that is, the ground wire), and the remaining yellow or white wire is called the signal wire. To connect the two servos, you have to twist their red wires together and their black wires together, and then connect them to the power supply together. However, the signal wires cannot be combined together. They must be separated. One wire is connected to one signal port on the control board, and the other wire is connected to another signal port.
Why should the signal lines be separated? It's like two TVs in your home that can share the same power socket, but you have to use different remote controls to change channels. The same goes for servos. The power supply can be shared, but each servo needs an independent control signal to tell it which angle to turn. If you connect two signal lines together, the two servos will not know which one to listen to, and they will end up shaking randomly.
Just having a power supply is not enough. The servo cannot move by itself. There must be a "brain" to give it instructions. This brain is a control board that can output PWM (Pulse Width Modulation) signals. To put it bluntly, it is a device that can generate a specific waveform to let the servo know where you want it to go. The most common ones are Raspberry Pi, or a specialized servo driver board. For situations where we only play with two servos, Uno or Nano is more than enough, they are cheap and easy to learn.
However, if you want to upgrade your project in the future and add more servos, then I suggest you just buy a 16-channel servo driver board, for example. This thing is very smart. It only communicates with the control board through two pins, but it can control up to 16 servos. It also has its own voltage regulator, so you don’t have to worry about unstable voltage causing the servos to twitch. When choosing a board, don’t just look at the cheap one. Check whether there are many tutorials on it and whether the information is complete. This is very important for novices.
Many people struggle with the four words "simultaneous control", thinking that they have to act like twins at the same time. In fact, in the world of microcontrollers, "absolute simultaneousness" in the true sense cannot be achieved because the programs are executed one by one. But we can make them appear to be moving at the same time. How to do it? Don't delay for a long time after sending a servo command. Instead, use a fast loop to refresh the status of the two servos in turn and without interruption.
You can imagine that you are throwing two balls at the same time. It is impossible for both hands to exert force at the same moment, but with practice, you can make the two balls leave your hands almost at the same time. The "non-blocking delay" technique is used in programming. Several timing variables are set, and the position of the next servo is immediately refreshed as soon as the time is up. In this way, the two servos can work together to make coherent and smooth movements such as walking, shaking the head, and swinging the arms.
This is where novices stumble the most! The moment the servo is started, the current required is extremely large. If two servos are started at the same time, the current requirement is doubled. If you expect to use the 5V power from the USB interface on the control board to power two servos, there is basically no chance. The result will be that the servos shake like a sieve, or simply become unresponsive, or even crash the control board. Remember, you must prepare a separate “good” external power supply for the servo.
Specifically, for the common 9g small servos, if two of them work at the same time, it is recommended to use a 5V power supply with an output current of more than 2A. When wiring, combine the red wires of all servos and the black wires of all servos together, and then connect them to the external power supply. But there is still the most critical step: you must connect the negative pole (black wire) of the external power supply to the GND (ground) on the control board. This is called "common ground". If not, the signals will be messed up and the steering gear will still not be able to operate properly.
After talking so much, it’s finally time to get down to business. Let’s take the most commonly used one as an example. There are actually only a few steps to writing a program. First, introduce the servo control library at the beginning of the code, that is# . Then, give the two servos a name, such asServo ;andServo ;Insetup()function, use.(9);and.(10);to bind the two servo objects to pins 9 and 10 respectively where you connect the signal lines.
Next, you can issue commands inloop(), such as.write(90);which is to turn the No. 1 servo to 90 degrees. If you want them to cooperate, just.write(90); .write(0); delay(1000);and they will turn one to 90 degrees and the other to 0 degrees, pause for one second, and then make the next move. If you want to know more advanced gameplay, just search for "Two Servos Synchronous Control". There are a lot of ready-made examples on the Internet. You can copy and modify them to use.
You will definitely encounter problems when playing. The most common ones are the servo shaking or not moving at all. In 90% of cases, there is a problem with the power supply. Either the power supply current is not enough, or the "common ground" is forgotten. Check the power supply first, try changing to one with higher power, and then check whether the ground wire is connected. Another common problem is that the servo can only turn a little in one direction. This may be because the signal line is connected to a pin that does not support PWM. Check your board and change it to a pin with a "~" symbol.
If there is no response after uploading the program, check whether the library file has been imported and whether the name of the servo object is spelled incorrectly. These small problems are not difficult to troubleshoot. If you really can't figure it out, don't just think about it alone. You can go to the official websites of some professional technology companies, such as Aosong Robotics. Their websites have super detailed graphic tutorials and videos, as well as technical support. If you read more and ask more questions, the problem will be solved quickly.
Okay, I have told you everything that should be said and should not be said about the connection and use of the two servos. What's the weirdest problem you've ever encountered when connecting a servo? Come to the comment area and see if anyone can help you! If you find this article useful, don’t forget to like and share it so that more friends can avoid detours!
Update Time:2026-03-16
Contact Kpower's product specialist to recommend suitable motor or gearbox for your product.


