


TECHNICAL SUPPORT


Published 2026-03-16
When it comes to product innovation, the most troublesome thing is trying to make a certain part move, only to find out that when you buy theservo, you are dumbfounded, you don’t know how to connect the wires, and the code is even more confusing. Don't worry, it's actually very simple to make theservodo what you want. Today we will use the most down-to-earth method to break through the window paper ofservoprogramming to ensure that you can get started easily.
Many friends stepped into the trap at the first step and bought a servo but couldn't use it. There are mainly two types of servos on the market: analog and digital. Analog servos are cheap and sufficient for novices, but their response is slower. Digital servos have fast response, high accuracy, and are more expensive. If you are making a simple car or gimbal, just choose an ordinary analog servo.
In addition to type, also look at torque and size. The greater the torque, the greater the strength, but the size is also large, so you have to think about whether your product can fit in it. Also, don’t forget to check the working voltage, the common one is 5V. When choosing, it is best to buy a set that comes with a steering wheel and screws to save you the hassle of going back and forth.
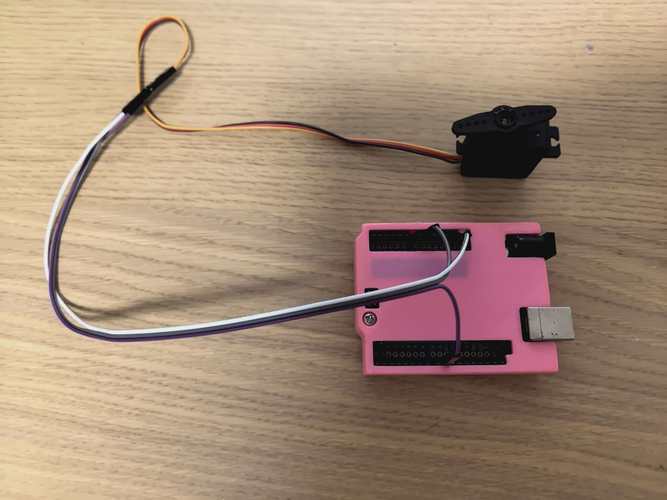
In terms of hardware, a UNO development board is the first choice. It is durable and has the most tutorials. Next is the breadboard and DuPont wire, which requires no soldering and is easy to plug in and out. With these things ready, you can set up the simplest experimental environment.
The software is simpler, go download IDE, this is free programming software. After opening, select the correct board model and COM port in the "Tools" menu. This step is like installing the driver on your computer. Only when you install it correctly can it be able to communicate with the hardware. Don't worry, you will get used to it after trying it twice.
To activate the rudder, the core code actually only has a few lines. First, we need to "summon" the servo library at the beginning of the program and write# . This is like asking a servo expert to help. Next, create a servo object and call it .
In thesetupfunction, the statement.(9);clearly informs the program that the signal line of the servo is connected to pin 9. Then, inloopfunction, use the.write(90);command to accurately rotate the servo to a 90-degree position, and then usedelay(1000);to let the program wait for up to one second. After the code upload operation is completed, you will see that the servo has started to move. The whole process is so simple and easy.
In fact, the whole process is not complicated. Set the pin connections insetupfunction to lay the foundation for subsequent servo actions. Inloopfunction, the rotation of the servo is controlled in an orderly manner through specific angle settings and time delays. After uploading the code, the servo starts operating according to the preset instructions, clearly demonstrating the simplicity and effectiveness of the entire control process, allowing users to easily achieve basic control of the servo.
If you want the servo to accurately move to a specific position, the key lies in the value set in thewrite()function. Normally, the rotation range of the general servo is within the range of 0 to 180 degrees. When you enter.write(0);the servo will turn to the far left position; and when you enter180, it will turn to the far right position. You might as well try it, let the servo start from 0 degrees, slowly increase it to 180 degrees by increasing 10 degrees each time, and pause every 10 degrees in the middle to observe the rotation of the servo.
What's the use? Imagine making an automatic flower watering device. When the soil moisture sensor detects that it is too dry, it turns the servo 90 degrees and opens the water valve. Or make a pan/tilt and let the camera move with the target. Angle control is the cornerstone of these functions.
To make a robot that can wave or shake its head, the servo needs to swing back and forth. This process can be achieved with the help of loops. For example, useforloop to gradually increase the angle from 0 to 180, so that the servo will swing slowly; then, use aforloop to gradually decrease the angle from 180 to 0, and the servo will swing back. Put these two pieces of code intoloop, and the servo will start to shake its head in an infinite loop.
If you want to realize the robot's waving action, you can also use a similar method. Useforloop to control the angle of the servo so that it gradually changes from one starting angle to another to simulate the waving action. For example, gradually increase from a smaller angle to a suitable angle, and then gradually decrease from this angle back to the starting angle through anotherforloop. Put the corresponding two pieces of code intoloop, and the robot can wave in an infinite loop.
You can also control the speed of the swing by adjustingdelaytime between two loops. Set the time short and it will shake fast, like a small fan; set the time long, and it will shake slowly, like a dozing robot. This gives your product action an "emotion".
Once you learn the basic control, you can move it to your project. For example, make a smart car, install the steering gear under the ultrasonic sensor, shake your head left and right to detect obstacles, and decide which way to go. The code combines the logic of servo swing and motor drive, and usesifto determine the detected distance.
If the project is more complex, such as a hexapod robot that needs to control more than a dozen servos at the same time, then you have to learn a servo controller. At this time, you can search the official website of "A Company's Steering Gear Control". They have many ready-made controllers and tutorials, which can help you quickly complete complex movements and save a lot of debugging time.
With this servo in your hand, what cool action do you want it to help you achieve next? Is it shaking your head in greeting, or grabbing a small part with precision? Come to the comment area to chat about your thoughts. If you find the article useful, please give it a like so that more friends can see it!
Update Time:2026-03-16
Contact Kpower's product specialist to recommend suitable motor or gearbox for your product.


