


TECHNICAL SUPPORT


Published 2026-03-05
Have you ever thought about making a completely different clock yourself using a bunch of mechanical parts and a development board? It’s not the silent electronic screen, nor the traditional ticking sound of the pointer, but theservowith the pointer, rotating in a way full of mechanical beauty. Sound a bit complicated? Don't worry, it's actually easier than you think, and it's a lot more fun. Today we are going to talk about how to use theservoto build your own mechanical clock step by step, so that you can not only experience the joy of creation during the hands-on process, but also add a cool talking point to your home.
The most direct benefits of using a servo as a clock are "fun" and "unique". The clocks you buy on the market are all the same, but when you make one yourself, you have the final say, from the style of the dial to the way the hands move. The precise and mechanical "tick" sound when the steering gear turns is something that ordinary quartz clocks cannot provide. Moreover, this is an excellent introductory project that can help you understand servo control, microcontroller programming, and how time is calculated in the digital world. It serves multiple purposes.
This is a good question and one that everyone is most concerned about. To be honest, if you only rely on your own timer, there will indeed be deviations when running for a long time. It is normal to be off by a few seconds at the end of the day. But we have a solution, which is to add a "clock module" to it, such as this high-precision RTC module. This module has its own battery and crystal oscillator, and the time is very accurate. You only need to read the current time from it regularly, and then command the servo to turn to the corresponding position. In this way, your servo clock can be as accurate as a digital watch.
To start work, we must first prepare the "ingredients". The core must be a development board, such as the most common Uno or Nano. Then there are the servos. It is recommended to use two or three to control the hour and minute hands respectively. If you want the second hand to move, you have to prepare three. The RTC clock module is the key to ensuring accuracy, don't forget it. Next is the dial and hands, which you can use cardboard, acrylic or 3D printed. Finally, you need some Dupont wires, a breadboard for connection, and a power supply to power the servo, because direct connection may not provide enough power.
Programming is the soul of the entire project. The principle is actually not complicated: we get the current time through the RTC module, and then "map" this time into the angle at which the servo should rotate. For example, for a 180-degree servo, we set 0 degrees to correspond to 12 o'clock, 90 degrees to 3 o'clock, and so on. The difficulty is that the minute hand moves 6 degrees every minute, while the hour hand, in addition to moving 30 degrees every hour, also moves slowly between two hours as the minutes increase. For example, at 3:30, the hour hand should be exactly between 3 and 4. These calculation logics need to be accurately implemented in the code.
️Step one: Build the hardware circuit
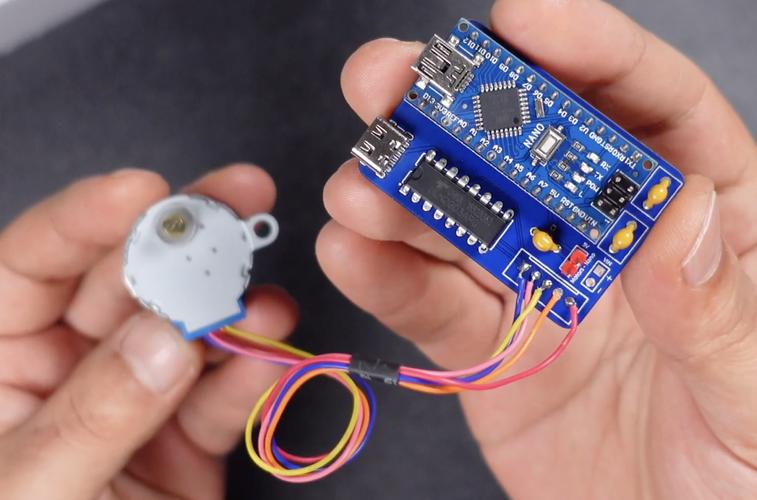
Don't rush to write the code first, set up the hardware. Connect the SDA and SCL pins of the RTC module to A4 and A5 respectively (this is the case on the Uno board), and connect VCC and GND. The signal lines of the servo are connected to the PWM pins, such as 9, 10, and 11. The red wire is connected to the 5V power supply (if the servo is larger, an external power supply is required), and the brown wire or black wire is connected to GND. It is recommended that you use a breadboard first and plug in all the lines to facilitate testing and adjustment.
️Step 2: Write and upload the code
Open the IDE, you need to install two libraries: one is to drive the RTC module, such as ""; the other is the "Servo" library to control the servo (this is built-in). The code logic is: initialize the RTC and servo in setup(), and return all pointers to zero. Then in loop(), continuously read the current time of RTC, calculate the angle corresponding to the hour hand and minute hand, and finally use the.write(angle)command to rotate the servo. In order to save power and reduce servo vibration, you can let it update its position every minute.
This step is very critical and is directly related to whether you can read the clock. Before installing the pointer on the servo rocker arm, be sure to turn the servo to the "reference position" first. For example, in the code, let the hour hand servo turn to 0 degrees, then manually align the hour hand with the 12 o'clock direction, and then put it on steadily. The same goes for the minute hand. If it is installed crookedly, the time displayed will be wrong. It is recommended that you first cut a simple dial out of paper and mark the approximate positions of 12, 3, 6, and 9 o'clock. During the debugging stage, install the pointer and correct the angle offset in the code little by little until the time is displayed accurately.
After the mechanical part is run through, you can make a beautiful shell for it. This is where you get creative. You can use discarded CD boxes to make a transparent dial, allowing the circuit board inside to be looming, giving it a sense of technology. It's also possible to laser cut a retro-style casing out of wood. You can hand-draw the numbers on the dial, or you can print out the fonts you like from the Internet and paste them on them. If you want to make the pointer more special, you can use a thin sheet of metal to cut out the shape you like. Remember, there is no standard answer for the casing of this clock, your aesthetic is the only criterion.
After reading this, do you think it’s not that difficult to make a clock with a servo? From understanding the principles, preparing parts, to hands-on programming and assembly, every step is a process of learning and creation. You can't buy the feeling of accomplishment you get when your friends marvel at this one-of-a-kind clock. I especially want to know, if you were to do it, what special functions would you want to add to this clock? For example, to tell the time on the hour, or to use LED light strips to create a dreamy background light? Welcome to share your fantastic ideas in the comment area. If you think this article is helpful to you, don’t forget to like it and share it with more hands-on friends!
Update Time:2026-03-05
Contact Kpower's product specialist to recommend suitable motor or gearbox for your product.


