


TECHNICAL SUPPORT


Published 2026-04-01
Replacing aservomotor is one of the most common repair tasks in robotics, RC vehicles, and industrial automation. Whether yourservois stripped, unresponsive, or simply too weak for its application, understanding the correct replacement process ensures your equipment returns to optimal performance without causing further damage. This guide provides a complete, actionable walkthrough based on standard engineering practices and verified manufacturer specifications.
Before beginning any replacement, confirm that the servo is actually the problem. In a typical RC car scenario, if the wheels no longer respond to steering input but the motor still runs, the servo may be faulty. Common failure indicators include:
No movementdespite power and signal input
Grinding or clicking noisesindicating stripped internal gears
Jittering or uncontrolled oscillationsuggesting a damaged control board or potentiometer
Physical damageto the case, wires,or output spline
Excessive heatduring normal operation
If you observe any of these symptoms, replacement is the standard and most reliable solution.
Choosing the right servo is critical. Servos are not universally interchangeable. The three primary specifications you must match or exceed are:
| Specification | Description | How to Verify |
|---|---|---|
| Physical Size | Standard, micro, mini, or sub-micro | Measure the existing servo’s length, width, and height. Common standard sizes are 40x20x36mm. |
| Torque | Measured in kg-cm or oz-in | Check the original servo’s datasheet. For a typical 1/10 scale RC car, 10-15 kg-cm is standard; for a 1/8 scale, 20-30 kg-cm may be required. |
| Voltage | Operating voltage range | Most servos operate at 4.8V-6.0V (NiMH) or 6.0V-7.4V (LiPo). Using a servo outside its voltage range will cause failure. |
Critical Note:Always verify thespline countandgear type(e.g., 25T for Futaba, 23T for JR) if you are reusing the original servo horn. Using an incompatible horn can strip the new servo immediately.
A methodical workspace prevents lost parts and ensures safety. You will need:
Screwdrivers: Typically Phillips #0, #1, or hex drivers depending on your equipment
Servo removal tool(optional but helpful for tight installations)
Soldering iron and heat shrinkif the servo wires are hardwired (not using a connector)
Servo horn(if not included with the new servo)
Threadlocker(low-strength, blue) for metal-to-metal screw connections
Camera or notebookto document wire routing and linkage positions before disassembly
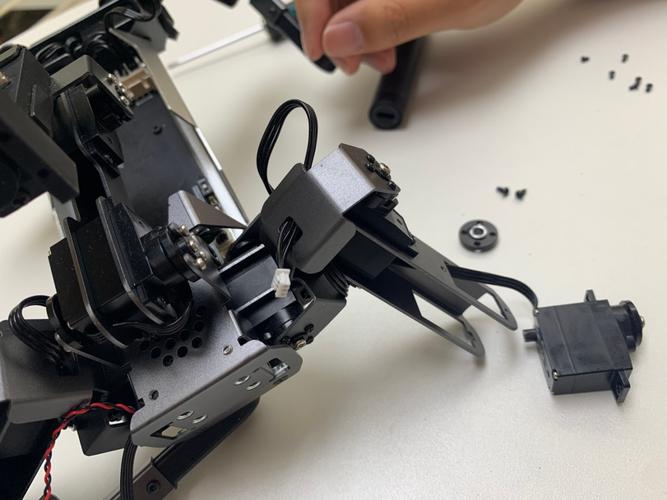
1. Disconnect power– Remove the battery from the device to prevent accidental short circuits or unintended activation.
2. Remove the servo horn– Unscrew the center screw. If the horn is stuck, do not pry aggressively. Use a servo horn puller or gently wiggle while applying upward pressure.
3. Disconnect the servo linkage– Note the exact linkage geometry. In a common case like a 4WD RC monster truck, the steering linkage often has a specific pivot ball setup. Remove the linkage from the horn, not from the axle, to preserve alignment.
4. Unplug the servo– Trace the wire to the receiver or controller. Note which channel it uses (usually channel 1 for steering, channel 2 for throttle). If wires are routed through cable clips, take a photo.
5. Remove mounting screws– Unscrew the servo from its mount. Keep screws organized by location, as lengths may vary.
1. Test the new servo before installation– Connect it to your receiver or servo tester with power applied. Center the servo using your transmitter (with all trims at zero). Verify that the output spline rotates smoothly and centers correctly. This step alone prevents the frustration of reinstalling a defective unit.
2. Install the servo horn– With the servo powered and centered, attach the horn as close to 90 degrees to the linkage direction as possible. Use the spline that achieves the straightest alignment. Apply a small amount of blue threadlocker to the screw if it is metal-on-metal.
3. Mount the servo– Secure the servo to its mount using the original screws. Do not overtighten, as servo cases are typically plastic and can crack. Torque to “snug” only.
4. Route the wire– Follow the original path exactly. Use cable clips or zip ties to keep the wire away from moving parts, gears, or heat sources. Leave a small service loop near the servo to prevent tension during suspension movement.
5. Reconnect the linkage– Attach the linkage to the servo horn. The linkage length should match your original setup. If you changed the servo horn type or servo dimensions, you may need to adjust the linkage length to achieve proper alignment.
Post-installation calibration is non-negotiable. Even if the servo is identical, manufacturing tolerances vary.
1. Set all trims to zeroon your transmitter.
2. Power on the systemwith the wheels off the ground.
3. Check center point– If the wheels are not straight, adjust the servo horn position, not the transmitter trim, for gross adjustments. Use trim only for fine-tuning.
4. Set endpoints– Most modern transmitters allow endpoint adjustment (EPA). Slowly turn the steering to full lock in each direction. Ensure the linkage does not bind and the servo is not straining at the end of its travel. Binding is the number one cause of premature servo failure.
5. Perform a stress test– With the device powered and on the ground, apply light resistance to the linkage while operating the servo. The servo should hold position without stuttering or losing power.
Forcing a servo horn that does not fit– This strips the spline immediately. Always match spline count.
Using the wrong screw length– A screw that is too long can pierce the servo case and damage internal electronics.
Skipping the centering step– Installing a horn on a non-centered servo leads to asymmetric travel and potential binding.
Ignoring voltage requirements– Using a 7.4V-rated servo on a 6V system is safe but may reduce performance. Using a 6V-rated servo on a 7.4V system will cause overheating and failure.
Overtightening mounting screws– This warps the servo case and can cause internal gear misalignment.
If your application involves:
Safety-critical systems(e.g., aircraft control surfaces, industrial machinery)
Integrated circuits with proprietary connectors(common in some consumer electronics)
Warranty-sensitive equipment
Then professional replacement is strongly recommended. For most RC and hobby applications, the steps above are considered standard user-level maintenance.
Replacing a servo is a straightforward process when approached methodically. The key to a successful replacement isverification at every step: confirm the failure, match specifications precisely, test the new unit before installation, and calibrate endpoints to prevent binding.
To ensure long-term reliability:
Always purchase servos from reputable distributors that provide full datasheets
Keep a log of servo specifications for each of your devices to simplify future replacements
Inspect linkages regularly for wear, as worn linkage joints are often mistaken for servo failure
Store spare servos in a dry, static-free environment
By following this structured approach, you eliminate guesswork and reduce the risk of secondary damage, ensuring your equipment returns to service with factory-level reliability.
Update Time:2026-04-01
Contact Kpower's product specialist to recommend suitable motor or gearbox for your product.


