


TECHNICAL SUPPORT


Published 2026-03-31
If you've ever built an with a microservo, you've hitthe. Theservo, your board, or just sits there doing . That's not a code bug — it's apower. Think of a microservolike a tiny : it needs clean, to move . it, your robot arm or smart lock fails mid-. March 2026 is Month, and with of fresh , power right is the #1 skill from . This guide gives you the exact , specs, and code to run your micro servo — no, no.
a micro servo means and so the servo can move to your . A 9g micro servo (like the SG90 or SG90S) runs on4.8V to 6V. But here's the catch: when it or hits , draw . sits200–300mA. Stall — when the servo is — can hit700mA to over 1A. Your 's 5V pin can only about500mA total(with the board). That's why a servo into the 5V pin works for a few, then fails.
Bad power doesn't just make — it your . When drops below 4.7V on the 5V rail, the out and . You'll see the servo move a , then the board . This is the most in servo . power means your servo holds , moves its full 0–180° range, and doesn't .
, check your servo's . TheSG90Sdraws200–500mA whenand up to700mA. TheMG90S metal-gearpulls more. is :4.8V, 6V. Below 4.8V, drops and gets . Above 6V, you risk the board. For , a high- micro servo like the 9g metal servo draws800mA at stall on 4.8V, and on 6V. That's 2x what 's 5V pin can . Rule of thumb: any servo than a basic SG90 needs power.
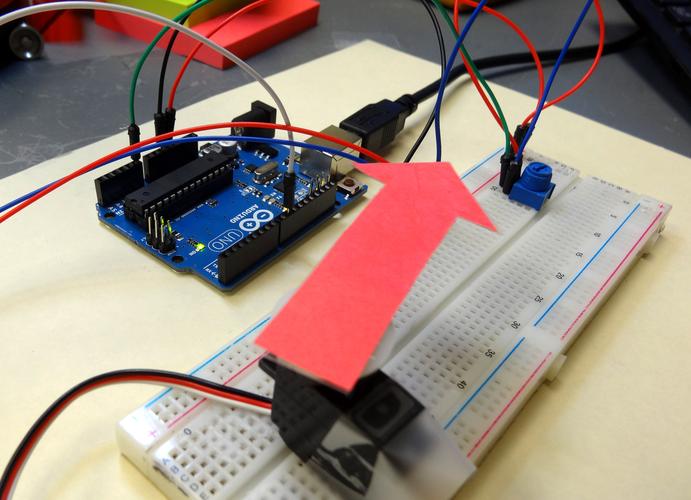
setup (power — the right way):
Get a5V / 2A poweror a2S LiPo (7.4V) with a 5V UBEC ( )
servored wire→ 5V
servobrown/black wire→ GNDANDGND (!)
servo/wire→ pin 9
Add a470µFthe 5V and GND near the servo
Code (to avoid):
# Servo ; void setup() { .(9); } void loop() { // move from 0 to 180 — stall for (int angle = 0; angle = 0; angle--) { .write(angle); delay(15); } delay(1000); } Why this works:Thedelay(15)a soft start. from 0° to 180° draws max stall . 1° every 15ms the load.
1: servo from 5V pin.This is #1. 's , drops, board .Fix:use 5V for servo power.
2: No.If servo runs from and from USB, their GNDs. a, the pin has no — servo won't move or acts.
3: Daisy- servo power.power from Servo 1 to Servo 2 to Servo 3 on a drops.Fix:Use star — each servo gets its own power wire from the point.
4: .A470µFand stops . Place it power rails right at the servo .
5: servo past . servo.write(200)the motor, stall . That heats and kills fast. Useservo.write(175)as your max.
Here's what to keep in your parts box for micro servo :
UBEC 5V / 3A— 2S-4S LiPo to clean 5V servo power. $8–10 on any maker site.
470µF 16V— One per servo. 90% of .
0.1µF— Place servo power pins for high-noise.
buck— step-down, up to 40V input, 5V at 3A. Great for car or solar-rigs.
MB102 power— Plugs onto , 5V at 700mA. for bench .
2S LiPo (7.4V) +— power for . Run time: 2–4 hours with servo .
For a tip:For multi-servo ,use apower boardfrom RC hobby . It gives you with built-in and LED .
Three core:First, never power a micro servo from 's 5V pin — use a 5V/2A or UBEC. , GND to GND and add a 470µF the servo power rails. Third, write code with small to avoid stall.
Your turn:Open your parts box, grab a 5V phone (2A ), cut a USB cable for the power wires, and wire up your servo using the power from this guide. Test the sweep code above — your servo will run than ever.
Got a servo that still after power? Drop the in the — your servo model, power specs, and a photo of your . We'll debug it .
Update Time:2026-03-31
Contact Kpower's product specialist to recommend suitable motor or gearbox for your product.


